
DIY Industrial Steam Punk Pipe Table Lamp
Making your own lamp may sound intimidating, but with some good instructions, it is well within the reach of a novice DIYer.
This tutorial will explain the entire process, step by step, so you can easily follow along and end up with your very own, hand made, industrial pipe, steam punk, table lamp - pictured below - that you can say you built with your own hands!
Without further ado, let’s get started!
Everything You Need
You can go to the hardware store and buy real industrial pipes, which are often referred to as nipples, but these pipes and fittings are far from cheap. And for a lamp cheap knockoffs from amazon.com will work just as good. So, for you, I did my best to find packages of parts that will work well for this project.
Some of the packages may have extra parts left over but you will still save money buying these over getting the real stuff from a hardware store.
These are affiliate links. Buying through these links will not only help to compensate me for my time and to show appreciation for the effort that I put in to helping you make this lamp, but it will also make it easier for you to get parts that will work well together.
You can alter the lengths of the pipes to suit your needs better. These are just the lengths that I used.
Get these from the affiliate links below and save some money
4 - ¾ inch tees. Use this package of tees and elbows. You’ll have a bunch left over but it’s still cheaper than buying them individually.
7 - ¾ inch elbows. Same package as above.
7 - ¾ x 2.5 inch black iron nipples. This ten pack seems like a great deal for quality pipes.
1 - Lamp Socket. Don’t cheap out on the socket. Get a really nice one like this!
4 - Furniture Leveling Feet. You can find cheaper ones than these but spending more on quality leveling feet is one of those small touches that can add a dramatic amount of appeal to your lamp!
1 - Lamp Cord. This is the same lamp cord that I use. You can get the black one but you may want to try this rust colored one.
A few feet of ⅜ inch Black Tubing. You can buy an entire roll of it but you will have a lot left over. Alternatively you can try buying a few feet at your local hardware store and painting it black. I don’t know how well that will work though. This is the roll that I use nonetheless.
You need a few feet of braided conduit. This stuff is great though you’ll have to get the entire roll. I don’t recommend sending the wire through the lamp tubing without some sort of conduit and this is the easiest stuff I’ve found that works for this purpose.
Get these parts from your local hardware store.
2 - ¾ x 6 inch black iron nipples (pipes, nipples is an industry term for precut lengths of pipes).
1 - ¾ x 15 inch nipple.
⅛ inch Threaded lamp rod. You just need an inch or two of this. You can also buy a package of pre-cut rod here
4 - ¾ black iron plugs. You can try finding these on amazon but I don’t think you’ll save much money. You mine as well get the real deal from a hardware store
1 - ¾ x ⅛ inch bushing. This is what we’ll use to attach the lamp rod to the lamp.
1 - ¾ x ¼ inch bushing. We will send the conduit with the lamp wire out of the lamp through this. You may need to drill the hole out a bit to get the ⅜ inch tubing to fit through it. You can also substitute this for a black iron plug but you’ll have to drill the hole from scratch with this.
Tools that You’ll Need
A hot knife. I highly recommend getting a hot knife for cutting the conduit. It is great for cutting woven materials. It quickly cuts through them and melts the fibers together so they don’t fray. You’ll have no idea how much you always needed one of these until you get one.
A pair of channel locks
Either 2 channel locks, 2 pipe wrenches or one of each. You just need 2 tools to tighten the pipes with.
A pair of needle nose pliers will help
Electrical tape.
Denatured or rubbing alcohol for cleaning the pipes
The easiest pair of wire strippers that you’ll ever use!
You’ll need the proper size drill bit and tap kit if you wish to add adjustable furniture leveling feet. This one has ever sized tap that you could need!
Lets Get Started!
Tighten everything up with your wrenches as you go.
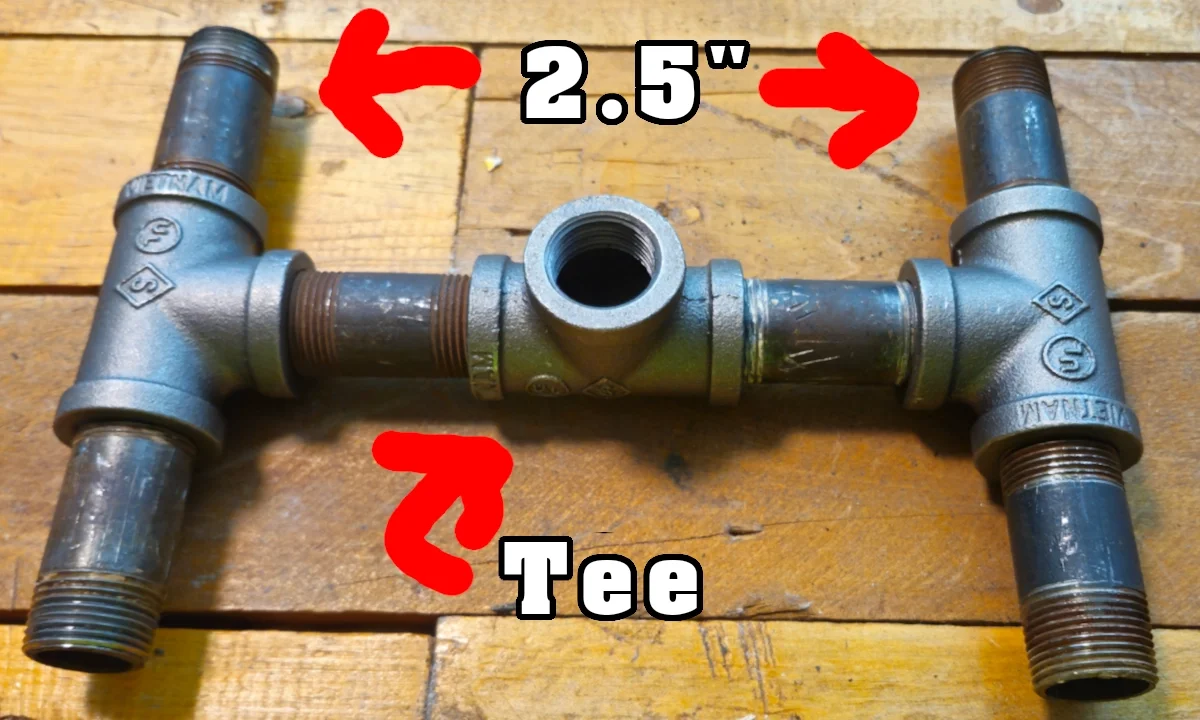
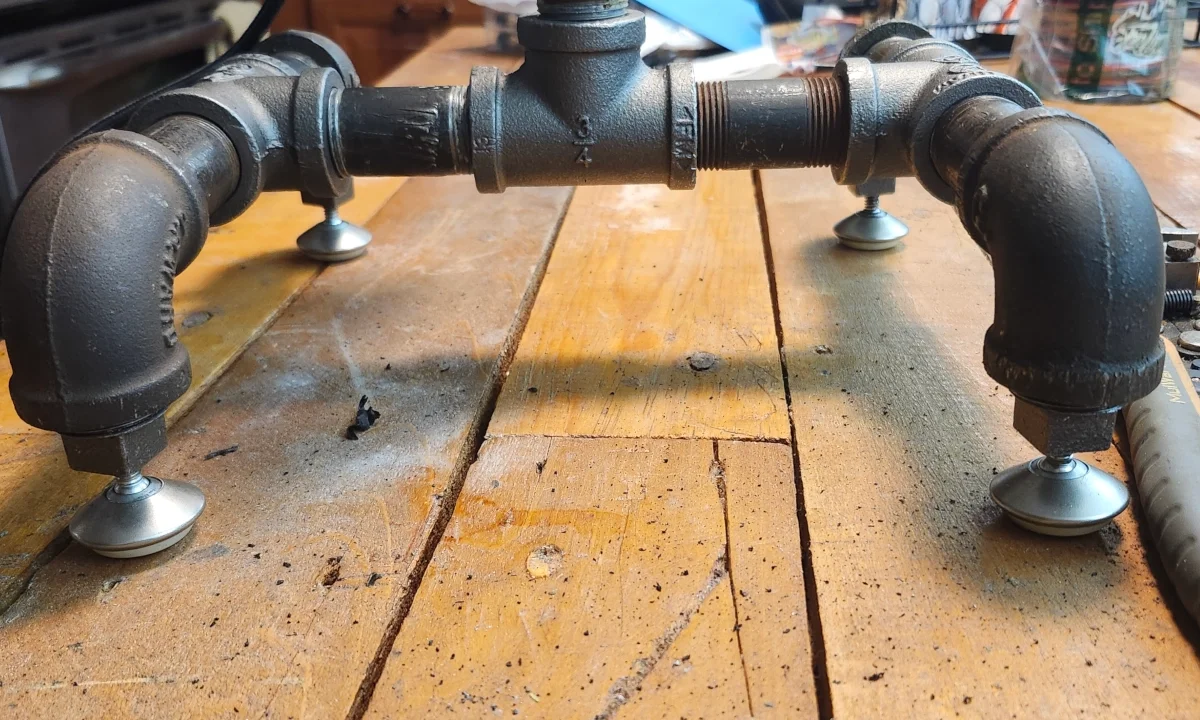
We will start by making the base.
Grab 3 tees, 4 elbows and 6 - 2.5 inch nipples.
Attach a 2.5 inch nipple to the 2 outlet sides of one tee. For now leave the top part of the tee empty. Then attach the inlets of the other 2 tees to the 2.5 inch nipples that we attached to the outlet of the first tee.
Next we will attach 4 - 2.5 inch nipples to all 4 sides of the 2 tees and we will put elbows on the other end of the nipples.
And just like that we are done with the base!
For now…
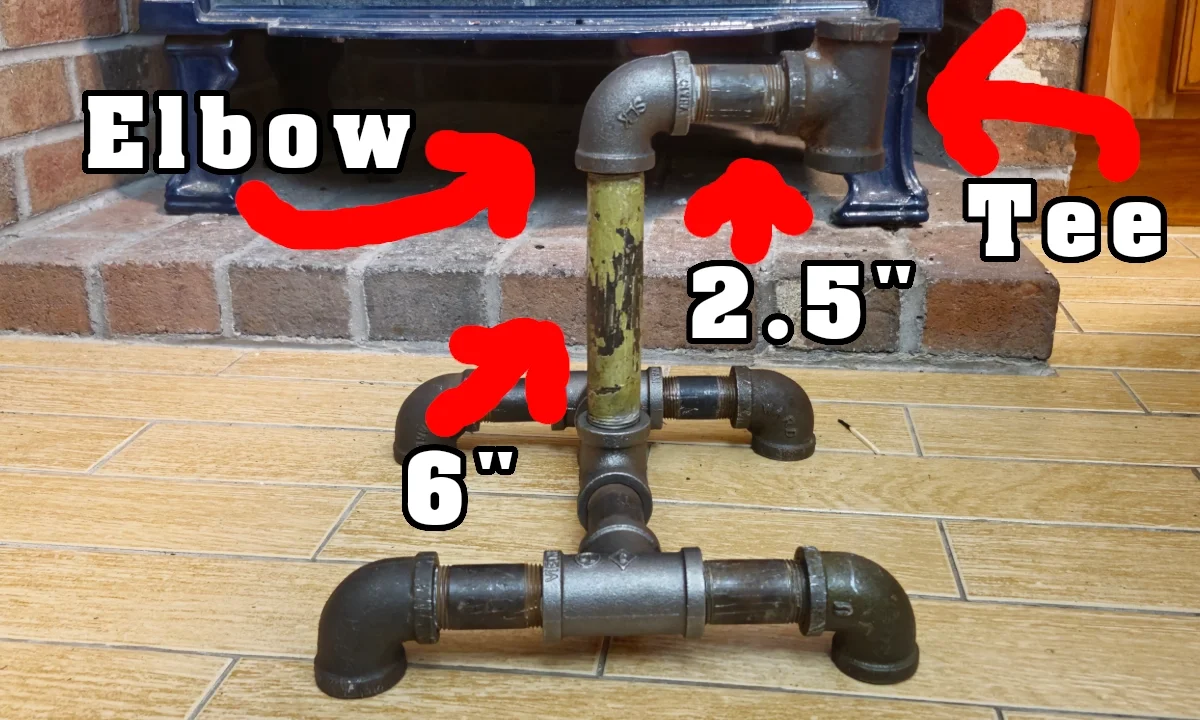
Making the Midsection
For the next step we will need 1 more tee, a 6 inch nipple, another 2.5 inch nipple, and an elbow.
Now we will assemble the beginnings of the portion that will accept the wire and conduit for our lamp.
Attach the 6 inch pipe to the tee that makes up the lamp base.
Put an elbow on the other end of the 6 inch nipple and face it toward the back of the lamp.
Use your last 2.5 inch nipple on this elbow and attach the inlet of your tee to that.
We are finished with the lamp midsection. Next we will dive into wiring the lamp!
Finishing the Skeleton
Now we are going to finish the rough shape of your lamp.
For this section we will need our conduit, the 15 inch nipple, 2 elbows, a 6 inch nipple, and a ¾ x ¼ and ¾ x ⅛ inch bushing.
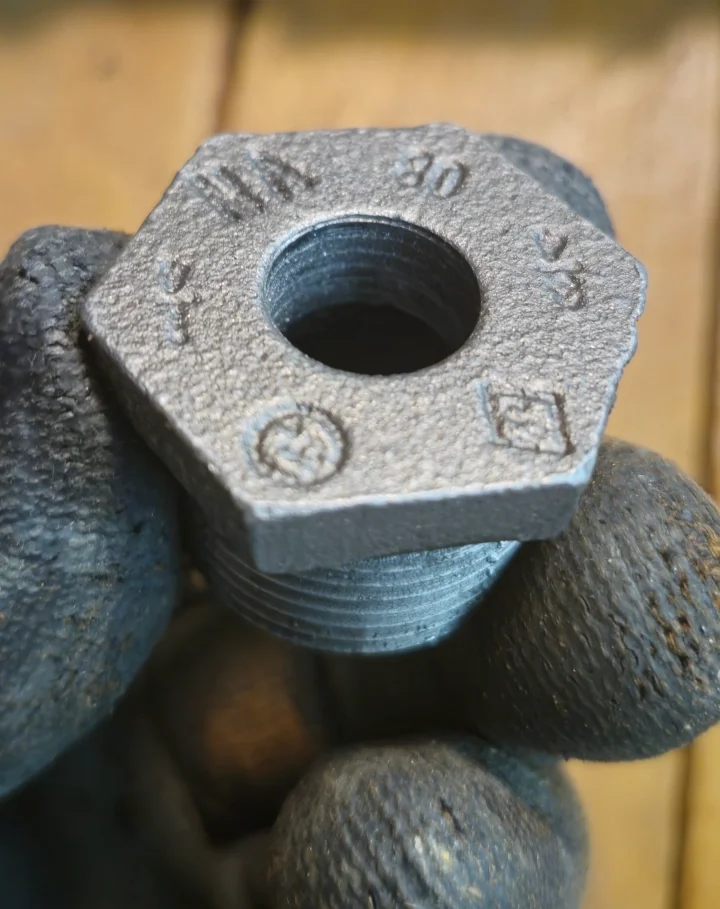
3/4 x 1/4 bushing
Use the larger of the 2 bushings to run the plastic tubing through. You may need to drill the threads out in the bushing to make it fit.
For this step, if using the ⅜ inch tubing you can substitute a plug for the bushing. Plugs tend to be cheaper so this may be worth your while. You should be able to drill a ⅜ inch hole through the plug without compromising its structural integrity too much so you can pass the tubing through the plug instead.
Use your discretion here.
Put the tubing through the bushing or the plug so the threads face the tee.

Attach the bushing to the tee that we assembled earlier and stick the tubing out of the outlet so 15 plus inches of tubing hang out the top of the tee.
Now put the tubing through the 15 inch piece and tighten it to the tee.

Back enough tubing back through the 15 inch nipple so you can attach an elbow to the other end of it. Spin the elbow so it faces the front of the lamp. You want the elbow attached to the 6 inch nipple below to be facing the opposite direction of this one.

Now pull six plus inches of tubing through the elbow and slide it through a six inch nipple and tighten the nipple to the elbow.
Attach an elbow to the end of the 6 inch nipple.
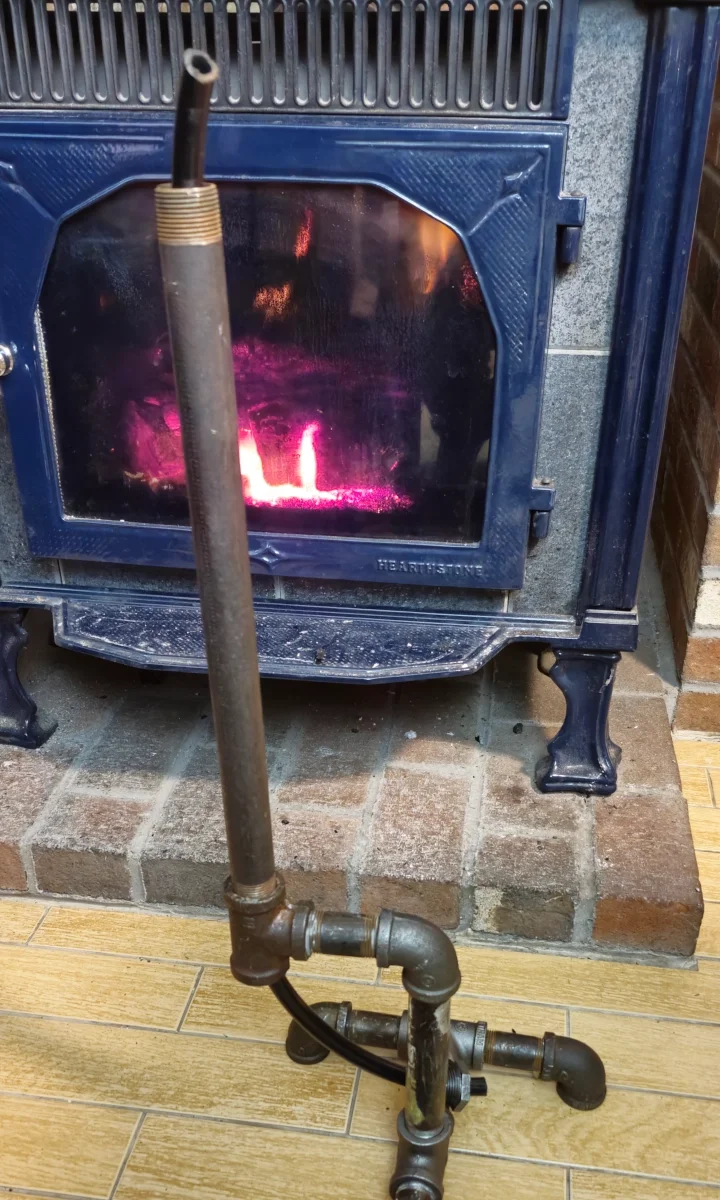
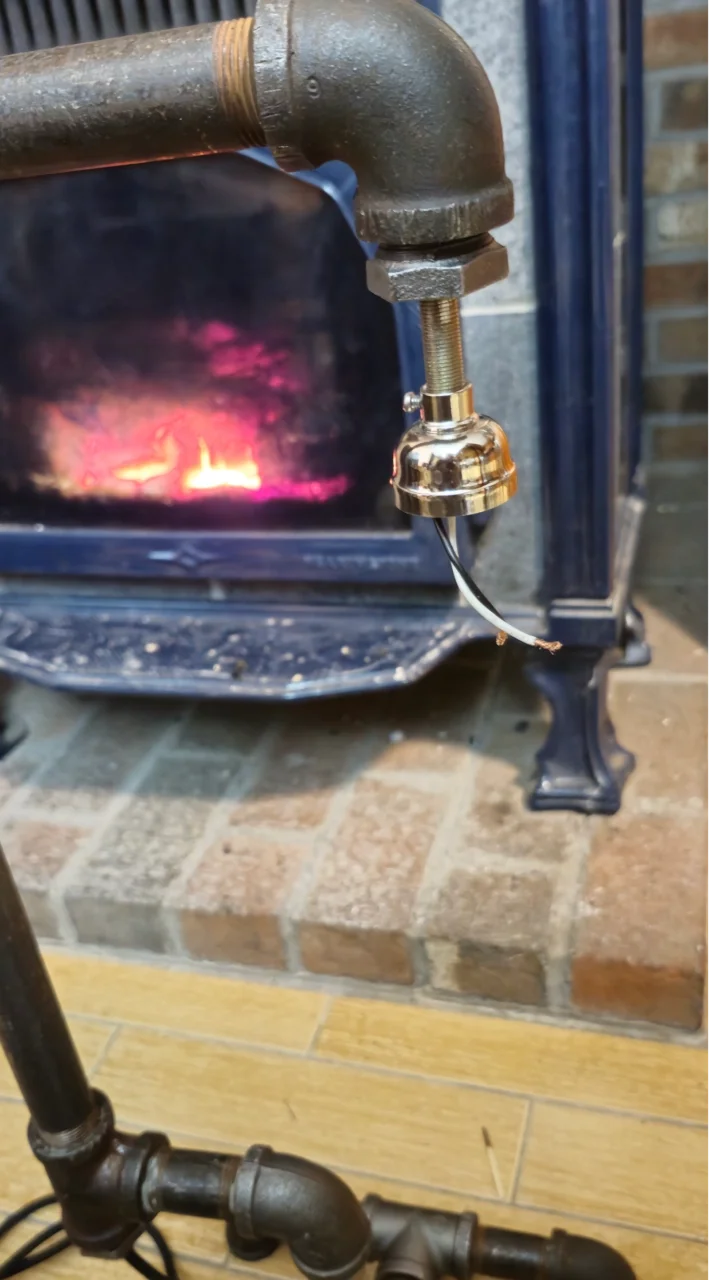
The main structure of the lamp is now complete.
Lets Get the Wires!
Before I go any further. There is one very important thing that you must know.
I AM NOT AN ELECTRICIAN.
I repeat…
I AM NOT AN ELECTRICIAN.
I'm a hobbyist who has wired many of these lamps. If you want a definitive guide on how to wire these then contact a real electrician because that is not me.
You assume all risk by wiring this lamp or any lamp while following this or any guide from me.
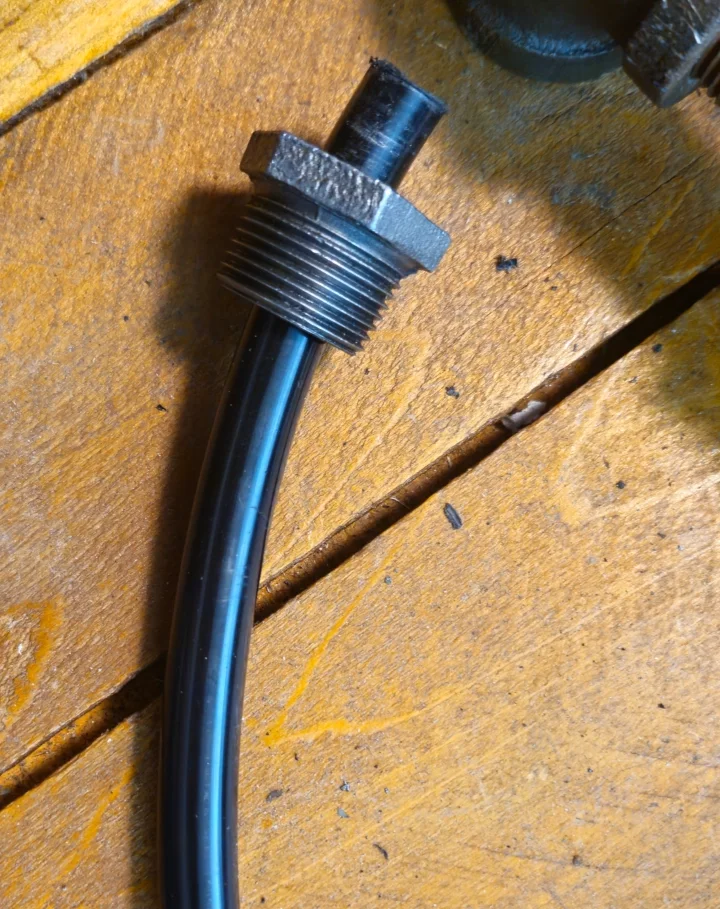
Prep the Wire
Wiring the lamp is actually quite simple.
Start by cutting some of the PET braided conduit. You should make the length about the same as the tubing.
We want the braided conduit to go further than the tubing into the lamp rod all the way into the socket, but we do not want it to go past the tubing where it exits the lamp through the bushing.
You may need to strip off some of the wiring jacket to expose more of the inner cables. Once you get the desired length run the wire through the braided tubing.
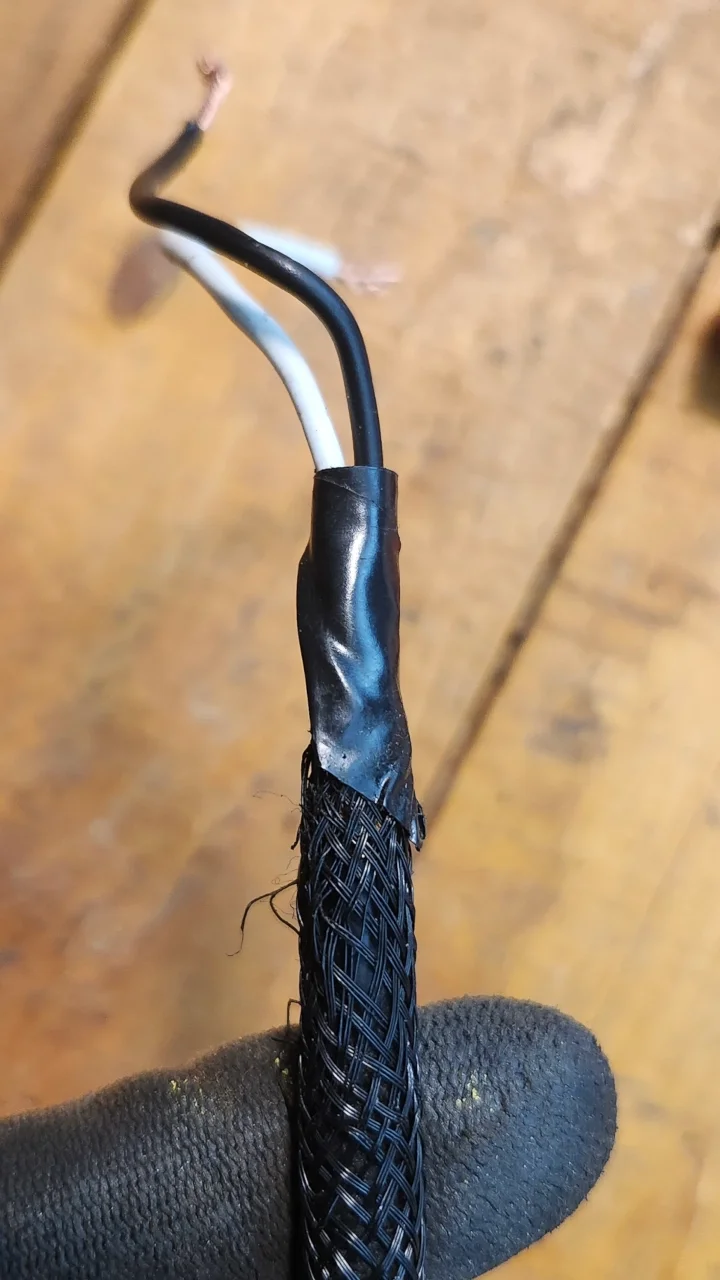
Tape the end of the conduit to the wire to ensure that it won't slip through.
Send It Through
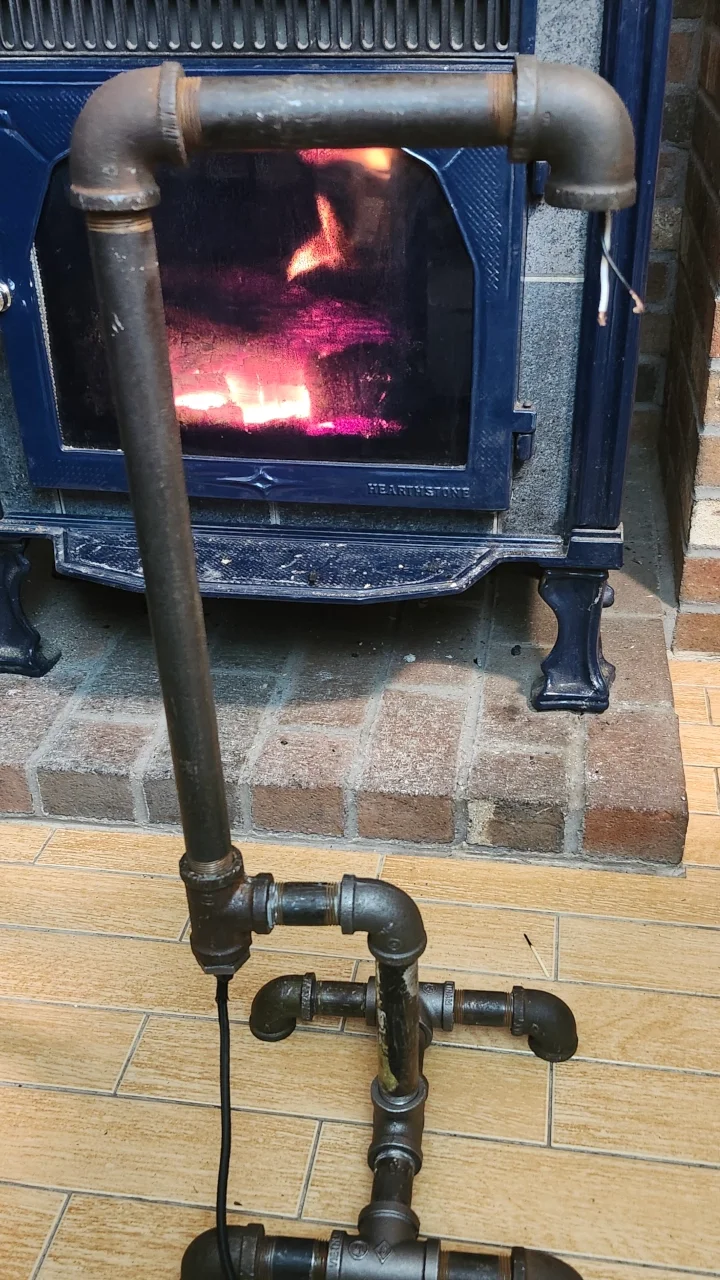
Now attach your ¾ x ⅛ inch bushing to the elbow and send the braided conduit with the wire through it.
Finish it Up
With the wire going through the bushing we need only to attach the socket. And we will do this by either using the precut lengths of lamp rod that are linked to here, or by cutting our own length of lamp rod, with a hacksaw, that you’ll purchase at a hardware store.
How long should the rod be?
If you wish for the lamp rod to be hidden then it is advised to use a piece that is a little bit less than an inch long. After tightening a short rod like this into the bushing and then into the base of the socket the rod itself will be invisible. Or if you want to see the rod you can use a longer one.
Send it Home
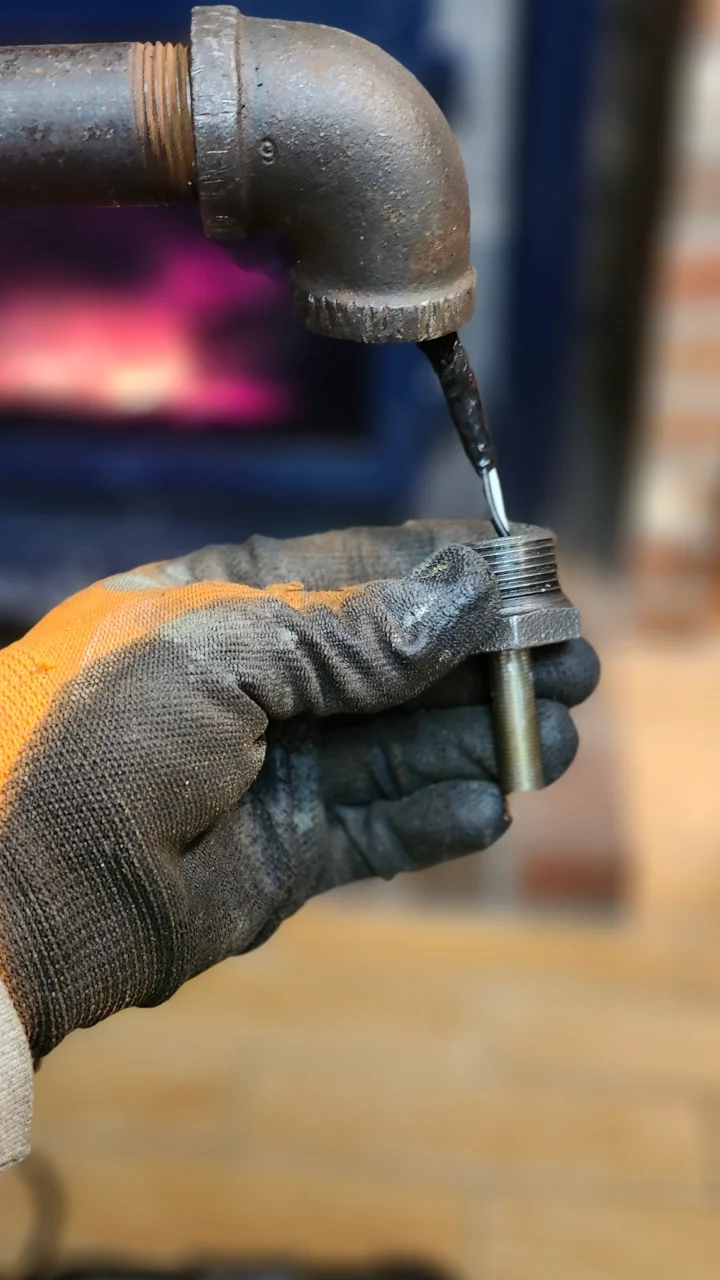
Regardless of your stylistic choice we will pull the wire, along with the braided conduit, through the lamp rod and then tighten the rod to the busing.
If you are having trouble pulling the wire with the conduit through the rod then try peeling back the tape and re-tape it with a shorter piece and wrap it really tight.
Don’t damage the threads!
When you are tightening the lamp rod to the bushing you have to be careful not to damage the threads.
Do not use a big pipe wrench as this will literally crush the rod.
You need to use a small pair of channel locks or some other small tool that won’t clamp down too hard or allow you to get too much leverage.
You will also need to protect the threads by wrapping something like a small towel around them while you're holding them with the channel locks.
And don’t muscle it too much. If you’re really muscling it then you’re probably going to crush the rod or at least damage the threads
Finishing it Up
Once you get the wire through the lamp rod, separate the two halves of the lamp socket, pull out the innards, back out the set screw, and screw the top half to the lamp rod.
Before doing this it may be a good idea to take pictures of the lamp socket while it is together so you can reference them when putting it back together.
Check out this guide on how to tie an underwriters knot and tie one before moving on. This will protect the connections from being pulled on if someone trips on the wire.
Finishing the Wiring
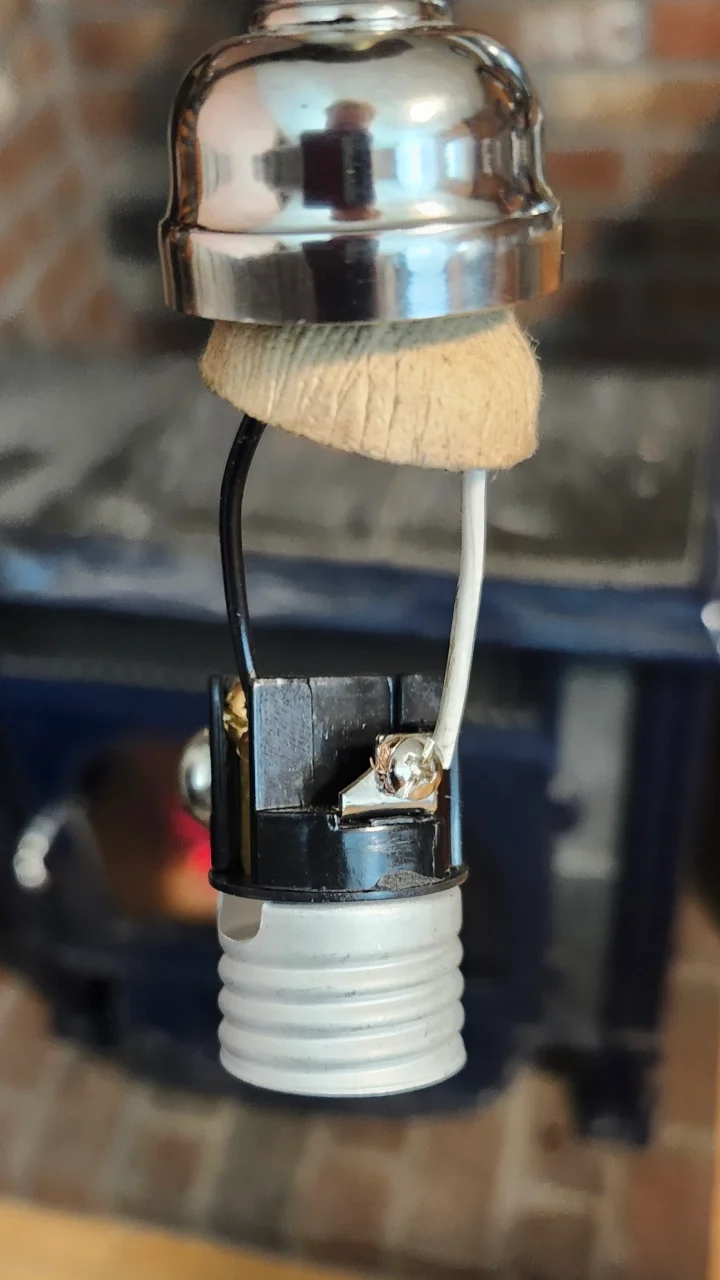
To make the lamp functional, all there is left to do is to wire up the socket.
On the socket is a gold and a silver screw. The gold screw is where the hot -black- wire goes and the silver screw is where the neutral -white- wire goes.
Wrap the wires around the terminals in the direction that the screw turns.
This is important. If you wrap the wire in the wrong direction then the connection will not be as good.
With the wire wrapped around the terminal simply tighten the screws down to hold them in place. And you are finished wiring the lamp!
Putting it back together
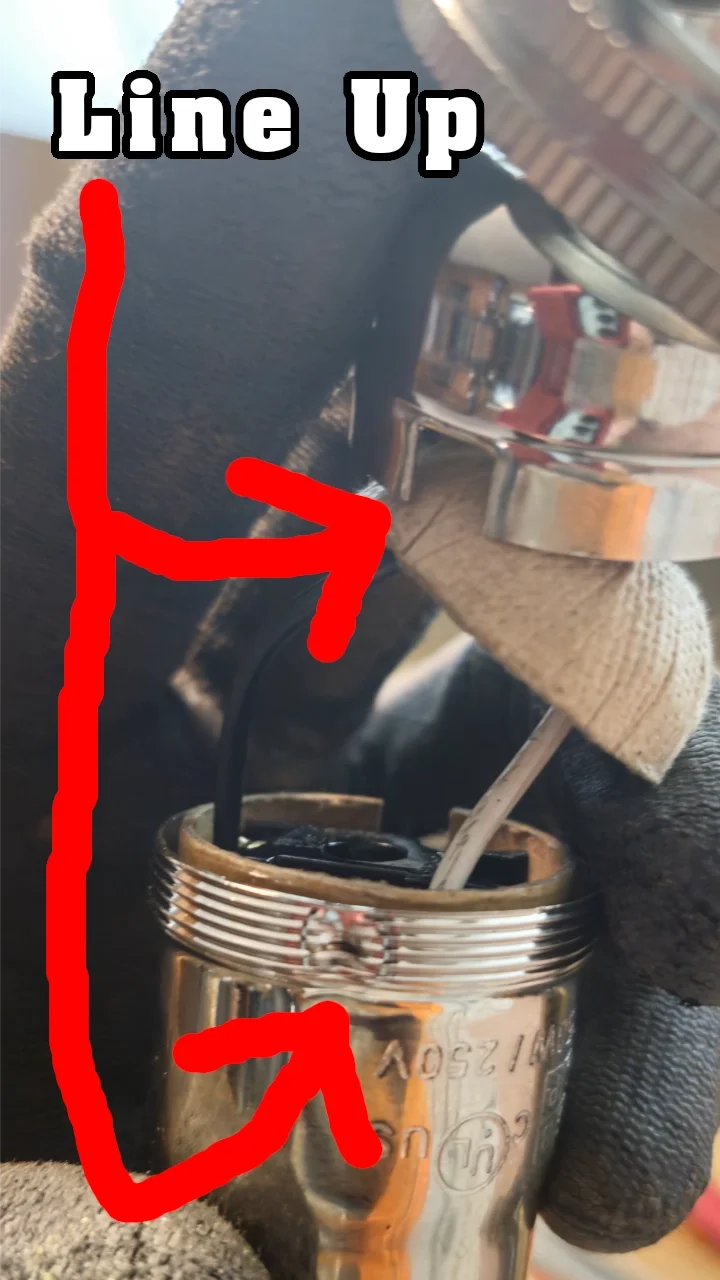
If you took pictures of the socket before disassembling it then reference those, otherwise simply line the bump on the socket body with the notch on the base and push the two halves together being careful not to pinch the wires. Then tighten the ring down and tighten the set screw.
You are all done wiring the lamp. Put a bulb into it and gaze at its glorious glow!
Let’s add some finishing touches
Add some Feet
We still need to do something with the elbows at the bottom of the lamp.
If you wish to keep it simple, then glue some felt pads to the 4 - ¾ inch plugs and screw them into the elbows.
But if you want to get a bit more fancy, and if you have a drill press, then drill and thread some holes into the plugs so they can accept the ¼ inch furniture leveling feet.
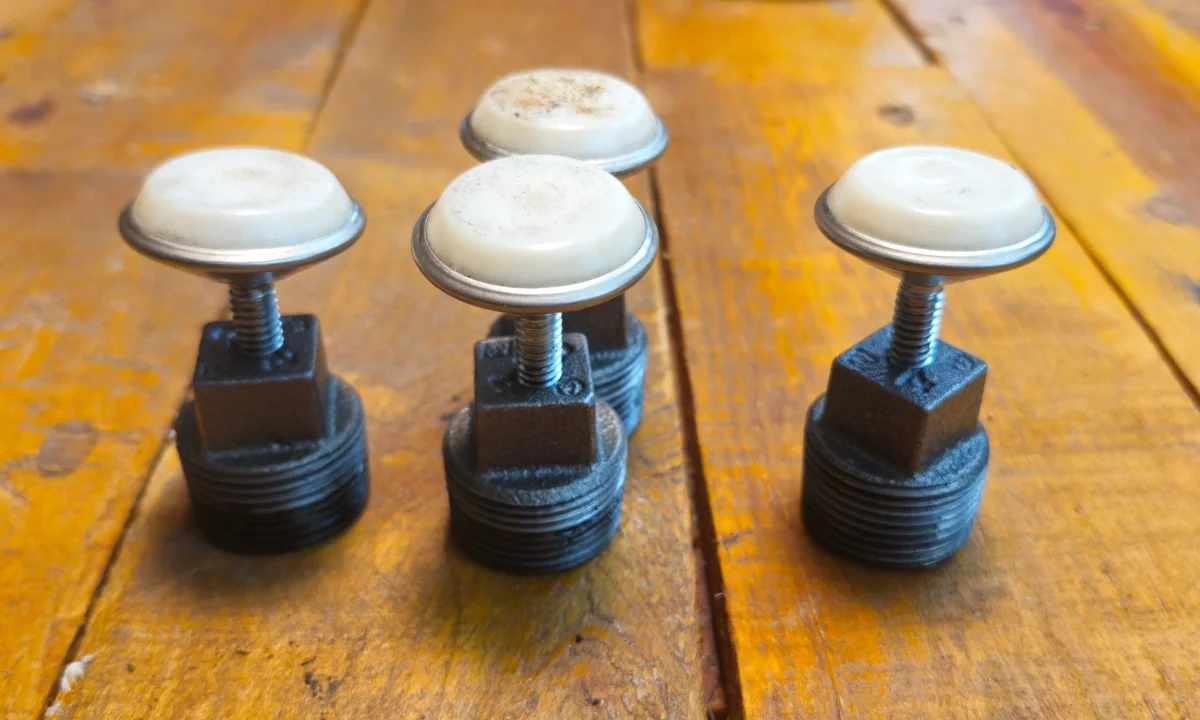
If you do not have a drill press then you should just go with the felt pads but otherwise get a 13/64 inch drill bit, drill holes through each plug and thread the holes with your ¼ inch 20 thread tap. Then simply screw the feet into the plugs and screw the plugs to the elbows and you will have a very nice and professional looking lamp!
Add Paint
The easiest color to paint these lamps is black. I’m going to guess that upwards of 90% of these lamps are black and you can’t go wrong with that color, though if you want to live a bit more on the wild side then you may want to try red or some other color.
Regardless of the color you first must wipe all the oil and grime off the pipes with a rag and denatured alcohol. Give the pipes several hours to a full day for the alcohol to dry off and then coat with an oil based primer and either latex or oil paint.
If you use latex paint then you have to use the primer, but if you use oil paint then the primer is optional though still a good idea to use.
And Then There Was Light
Congratulations! If you’ve made it this far then you have a beautiful and functional lamp built with your own two hands!
You should pat yourself on the back, because not a lot of people can say that.
If you run into any trouble while building this then please leave a comment. I’ll do my best to provide guidance.
And if you were successful, then please let me know in the comments. It makes me happy hearing about my readers' success stories!